Rake And Trail Explained!
Understanding motorcycle geometry, or rake and trail, can seem confusing at first. As you study motorcycle trail, you probably think of all those high school or college math classes you skipped and wonder if you can even understand all the factors that go into a good, safe, comfortable chopper or stock motorcycle design.
The good news is that, unless you plan to become a from-scratch frame and suspension designer, you won't need a university degree and a keen understanding of tangents, sines, and cosines to comprehend the basic concepts you need to understand how your motorcycle functions as a synergistic creation of many parts. But knowing rake and trail (and fork rake) is something you should 'get'.
Rake and Trail Basics!
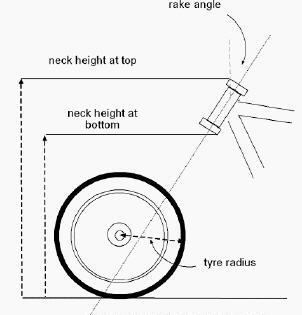
The front suspension of any motorcycle is made up of six key variables. Fork rake is the degrees of angle which the neck is angled from true vertical.
Fork rake works in most cases with the triple trees which create the fork rake; however, triple trees with raked steering stems have additional adjustments, usually of 3 to 7 degrees rake, which are used to adjust trail.
Fork length is simply the measurement, usually in inches, from the top of the fork tubes to the center-line of the front axle. Diameter of the front tire is another variable.
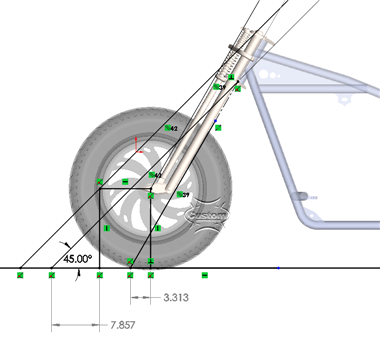
But trail is often the most difficult to understand. Trail is the distance determined when an imaginary vertical line is drawn from the front axle to the ground and that line intersects with another imaginary line going from the center-line of the steering neck to the ground. See why it is the most difficult to understand?
Let's break trail down so you can really envision what it means. Well, better yet, print this out, walk out to your shop or garage, get a tape measure and some chalk and perform these measurements so you can really see how it works.
Place your motorcycle in a fully upright position by putting it on the center stand in the case of a rigid frame. If you have a rear suspension, ask someone to sit on the bike, holding it upright so that their weight simulates the trail when the motorcycle is being ridden. Hold on, we're not done with rake and trail quite yet...
Hold a tape measure so that it forms a straight line from the front axle to the floor and place a chalk mark at the point where the tape measure touches the floor. Next, hold the tape measure next to the steering next and follow the angle of the steering neck down to the floor. Add another chalk mark at this point. With the tape measure, determine the distance between the two chalk marks. That is your trail measurement. It is most likely somewhere between 2 and 4 inches.
Trail has a lot of do with how well the bike steers. Having ridden, you know what is meant by "leaning into a curve". You don't actually move the handlebars to make small turns; you simply lean in the direction you want to go and the motorcycle moves with you. When the trail measurement is within normal limits, the cycle will move through these types of turns without any wobble or sway. In fact, the ride feels almost as if it is a part of your body, responding instantly to your every movement.
Negative Trail:
In a negative trail configuration the steering axle mark would be behind the front axle mark. In this situation, the motorcycle would handle great at low speed but would be nearly impossible to control at higher speeds. It would likely wobble so badly that a crash could occur at normal street speeds. If a motorcycle has too much trail, the high speed handling will be very steady, too steady in fact. But slower speeds will be, at best, very clumsy and most likely uncontrollable.
When designing a custom chopper, you must delve a bit deeper into the rake and trail concepts presented here in order to ensure that your design turns into a safe bike after you've turned the paper design into reality. Don't use trial and error when dealing with rake and trail, fork extension, offset, and tire diameter.
Related Article:


