A Unique Mini Chopper Build You Can Learn From!
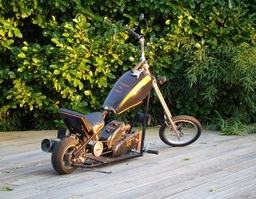
Hi! Here is the description of my mini chopper: the Poupoudoum (that's my nickname). Here I will give you specs on it, and I will try to give some advice and tips in as well.
Keep in mind that all measurement are in metric units you can convert them to inches using this tool.
It's a real honor to be next to high quality (and real size) choppers!
I built this chopper with one goal: If I put it next to any Japanese bike, people will forget about the big bike and look at the mini one! And it worked!
My budget was less than 500€ and I wanted to have enough power, a great look, and real comfort. Because of my short budget I had to use used and cheap mini chopper parts.
For the engine I had a 1962 Dolmar CC chain saw (80cc and 5HP). The rear wheel come from a Chinese pocket bike, the front one comes from a 16" bike. The fork bearing comes from a bicycle, as well as the front brakes, the bars, and the lights. I used some motorcycle parts such as the tank from a Yamaha 125cc, a 600cc muffler and some Harley Davidson foot pegs! The frame is built with 20 mm square tube and there are no bends (only welds).
At the time of this mini chopper build I was not a very good welder, but square tubing saved me from a lot of trouble!
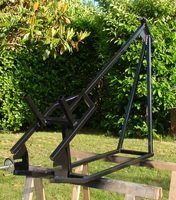
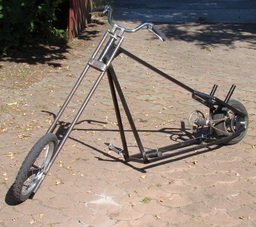
Before starting this mini chopper, and this is advice for the people who are not very experienced, I made precise plans. While making these plans, try to put the elements like the seat, bars and foot rests at their final distances to be sure the bike is suitable for you. Even if my bike is a real mini, people from 1m60 to 2m feel good on it.
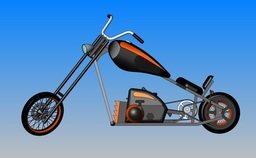
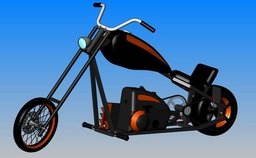
The plans will also help you building the bike you want, and you will avoid wasting time and money because your final frame doesn't look like you wished ,and you have to build a second one (I did this on other projects!).
To build the mini chopper frame I didn't used a JIG, I think it would have been a bit easier to have a strait frame. Because of my precise plans I just had to cut tubes to the size of my plans, assemble them, and to be sure of what I did I took a lot of measurements to double check my work. This is another advice, for mini or real-size builds, always double check your work!
The fork is another thing to build really strait and strong. On another mini chopper I lost two teeth because of a week fork!
Mine is a bit flexible, but it acts as a spring and give a smooth ride. On the other hand it is not really responsive and can vibrate on hard braking. I plan to consolidate it.
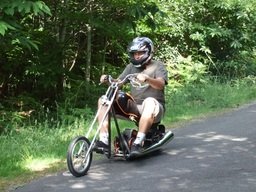
The transmission was, in my case an enormous source of problems! Here in France horizontal shaft briggs are really hard to come by and the karting clutches, chains and sprockets are both expensive and nearly impossible to find! So I had to build my own system. This was a really hard part of the mini chopper build. To give you an idea, the bike was built in about 30 days of work, and I had a rolling chassis the 4th day, and the transmission took more than 20 days to finally work well!
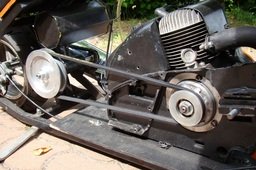
I used the pedals bearing of a bike as a jackshaft, the pedals sprocket as a part of the primary transmission, and welded a bicycle sprocket on the chain saw clutch. This system was a complete nightmare! Chains are complicated things, but bicycle chains are just not made to go fast and to handle this kind of power! I broke about 4 chains, nearly destroyed the sprockets, and the chain was going so damn fast that it was getting really hot (above 100°C!).
This chain made me crazy! I finally used a belt as primary transmission. Belts are just so simple and much more flexible than chains, it's paradise! I had to use a lathe to center my pulley on the clutch drum.
This is a picture of the mini chopper engine after it was painted...
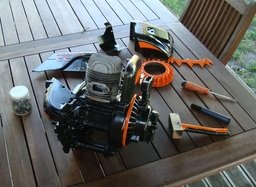
The final drive comes from a pocket bike and I had other problems with it, the engine has so much torque that I broke a chain and I nearly destroyed the wheel where the sprocket is attached!
Brakes are also a really important! My advice is to put brakes before the engine, and to have strong brakes. My mini chopper does over 60km/h, and I'm glad I have good brakes at this speed. Hurting yourself because you didn't put a helmet or because your brakes are not strong enough is something so stupid and can ruin your pleasure!
The paint is really simple and have been done for less than 30€! I used graffiti paint cans, it is really cheap and easy to apply. If you can afford it, use a compressor and real automotive paint, the paint will be nicer and stronger.
I'm currently planning to change things on this mini chopper: I will make the ground clearance a bit higher (I must admit that the frame touches the road in curves) and the fork stronger. The bicycle pedals bearing is also a bad choice for high revs, I plan to change it by two ball bearings.
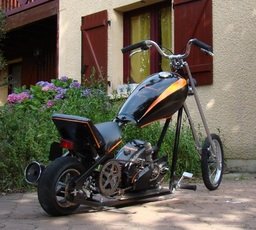
I built this mini chopper alone, but I made a lot of other bikes with my friends, check them out on my youtube channel or my website.
Alexandre.
Building A Mini Chopper?
Did you build, or are you building a mini chopper? Let see it! Upload pictures and write about it. You'll get a comment or two and get a mini bike building buddy out of it.
What Other Novice and Veteran Builders Are Saying
Click below to see contributions from other visitors to this page...
Mini Chopper Project For My Grandson! 


Almost three months and one bent axel, several stripet threads and broken bolts, this mini chopper came out like this. The seat height is 19 inches whellbase …
1 Off Home Made Springer Mini Bike 


I started having ideas of things I would like to create and try on a custom springer mini bike, 1 off level.
Probably like you! You know the things …
Mini Chopper With Springer Forks Not rated yet
I've been toying with the mini chopper with springer forks idea for a long time, and decided to act on it. starting with baja mini bike rims, and building …
Related Articles:
How To Build A Mini Bike or Chopper eBook
