Harley Engine Rebuild 101!
So you want to do a Harley engine rebuild and you're not sure where to start or what to do.
You've put many miles on your V-Twin engine and have decided it's time to do a top and bottom engine rebuild before next riding season.
Anyone who tells you a Harley engine rebuild is really, really easy is not telling you the real deal.
But it truly isn't that hard if you have good mechanical skills, a Harley factory service manual, the right tools, and some time. Well, you do need one more thing - some money.
If you don't have the skills, equipment, or time to do a Harley engine rebuild yourself, you have the options of using the Harley Davidson rebuild program.
If you opt for this method, simply take your bike to your local Harley dealer where you engine will be removed, disassembled, and shipped to Harley Davidson in a special container. For $2,000 and up (depends on your engine), you'll get a rebuilt engine back in about two weeks.
But, most people who regularly do their own wrenching can handle a Harley engine rebuild. The cost saved on labor should allow you to purchase any specialty tools you don't have already.
However, you probably want to locate a reliable local Harley mechanic for rebuilding your flywheels because this process requires a truing stand and some expensive one-time-use tools.
And, unless you happen to have a complete machine shop in your garage, you will also want to have your cylinders bored and valves checked and possibly ground by a good machine shop.
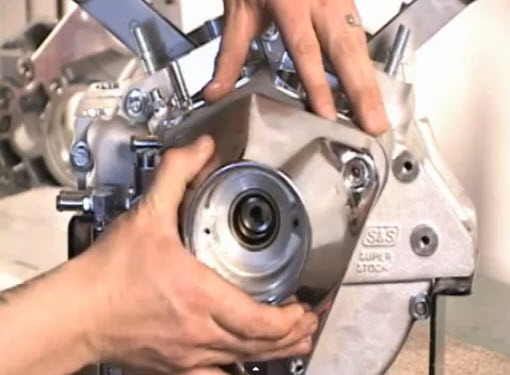
In this image Michael Durham, from the video Building A Shovelhead Style Engine, is installing the cam gear which is the final gear that is put in the bottom end.
Harley Engine Rebuild:
Let's go through the process for a cylinder upgrade to a bigger bore on a high mileage V-Twin engine. Before you begin, remove the exhaust and intake manifolds, horn, and gas tank. Put your motorcycle on a quality bike stand so that it will be level while you do your work; this really helps the process so don't think this is just a step to be skipped.
There are quite a few tools and miscellaneous items you'll need for this step of the Harley engine rebuild, but most of them are very likely already in your tool box. You'll need a 3/8 inch drive socket set and drive ratchet. A screwdriver and rubber mallet, feeler gauge and torque wrench will be necessary. A set of wrenches will get a lot of use. You'll also need a piston pin remover and installer as well as piston ring installer pliers and snap ring pliers. You'll also need a clean wire brush or two.
The miscellaneous items you'll want to have on hand include a coat hanger and wire cutter, two hose clamps big enough to go around a piston, a can of STP oil treatment and a can of brake cleaner, Loctite compound, and Teflon tape. You'll also want a ton of rags, a clean bucket or other container to hold water, a bucket to clean parts, some containers to place removed bolts and other items in, and some good hand cleaner.
A tip worthy of thought is in order. Plan to do any cosmetics to dress up your engine while parts are disassembled during the Harley engine rebuild because it is difficult after reassembly. You can clean the cylinders after the machine shop has finished their work.
You can clean and paint the heads and put that high polish on the valve covers. Even if your valve covers aren't chrome, a little polishing with ultra fine wet and dry sandpaper with good polishing compound will make aluminum look very good.
Push rod covers can be cleaned and polished with ultra fine sandpaper; if any chrome has flaked away, sand off any rust and clean the area with alcohol before painting with aerosol chrome paint followed by clear coat. Before using spray paint, be sure to mask the area before lightly applying chrome paint. Wait for the chrome paint to dry before applying the clear coat.
Now, let's start the Harley engine rebuilding. Remove the spark plugs. You'll see that the push rod covers as well as the push rods themselves will be labeled A-D as you look at the push rod side of the engine with A being the left-most pushrod on the rear cylinder.
Keep in mind this configuration as you work, refer to your service manual, or follow these instructions. Identify the spring lock retainer on push rod A and pry it out. Lift the bottom of the push rod cover and secure it with a piece of coat hanger to make it easier when working on the lifter.
Rotate your engine until push rod tappet A is completely at the bottom of the bore. Grab a wrench and hold the top adjusting screw tight while loosening the bottom lock nut. Spin the lock nut with your fingers all the way up to the base of the adjusting screw, then turn the adjusting screw all the way down into the bore.
Mark the exact spot on the push rod cover where the coat hanger is inserted, then remove the coat hanger.
Because push rods each have a wear for that specific rocker assembly and tappet, if you do not re-insert the coat hanger into the same spot later on, you could cause uneven, rapid wear. Next, lift the push rod and cover out of the tappet and head.
Repeat this process for the other push rods and covers, each time making certain the lifter, or tappet, is fully down into the bore when turning the engine. Remember, each time you must mark where the coat hanger was inserted.
Next, ensure the piston in the front cylinder is all the way down and remove the nuts at the cylinder base. Grab your rubber mallet and gently tap the cylinder just hard enough to break it free and then lift it up off the piston; make sure you lift straight up.
Fill the hole around the connecting rod with rags to prevent any debris getting inside and to prevent any rod contact with the case.
Move the piston down in the next cylinder and repeat this process. Using snap ring pliers, remove the snap rings which hold the piston pin in place. Then use the piston pin remover to remove the pin from the pistons. Then remove the bolts (remember not to lose any bolts!) securing the cylinder head and remove the head.
Use a clean wire brush to clean all carbon from the combustion chamber. Be thorough but make certain you DO NOT touch the valve seats because any scratches will result in leaking valves. If scratches happen, it will be necessary to re-seat the valves.
Put some water into a clean bucket or container and pour clean water into the intake port. Hold the head sideways and observe whether any water passes the intake valve and drips out. If not water escapes, the valve seat is too. Repeat on the exhaust valve. If there are absolutely no leaks, your cylinder head is almost certainly alright.
Examine closely for any visible chamber cracks. Look especially hard around the valves. Position an edge you know is PERFECTLY straight across the head and be sure there is the head is no warped. Repeat the warp check in several different positions.
If you find any warpage, check with a feeler gauge to be certain to be sure it is no more than .005 thousandths. If the warp is larger, your head will have to be machined, an added expense you don't want if the head is not warped.
Go to the Harley Davidson shop with your cylinders and have them checked and the inside diameter and taper measured. Also have the cylinder walls inspected for wear and determine if boring or honing is needed. If you are increasing the bore in the rebuild, have the cylinder walls bored for the size increase.
The Harley shop will sell you pistons, rings, and cylinder bore gaskets to match the new diameter after boring or honing. You'll also want to purchase your head gasket. Have the shop check that the head is not cracked and that the valve seats and guides are not overly worn. Buy your head gasket while you are at the shop, too.
Now it's time to install the rings on the pistons on this part of the Harley engine rebuild. Be sure the gaps are 180 degrees apart. Position each new piston over the rods and start the piston pins into the rods. Use the piston pin tool to pull each pin through the rod and into the piston center. Replace snap rings or clips in both sides of each piston.
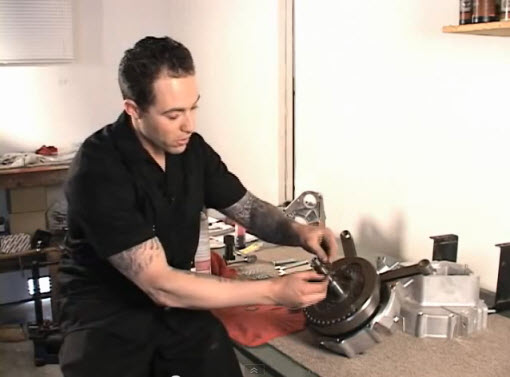
In the image above, Micheal is in the process of showing you how to add bearings to the shaft before the right side of the case is installed on the shovelhead engine.
Oil the rings and install a hose clamp over the rings. Tighten the clamp only enough to compress the rings without making them too tight. If the rings are too tight, they can slip completely into the cylinder, causing major problem. Raise the piston into the full up position by turning the engine.
Make sure your cylinder base is perfectly clean as well as the cylinder base gasket. Install the gasket, making certain nothing gets compressed between the cylinder bore and the new gasket. Holding the cylinder over the piston, lower the cylinder down over the rings and on the piston. Insert the cylinder until there is just space to remove the hose clamps, then remove the clamps and take them out.
Rotating the cylinder as needed, press it down on the stubs and install the nuts. Tighten the nuts in segments as if you were passing a jug around. Tighten the nut only a bit, then tighten the next nut a bit, repeating the rotation under the nuts are down. Look up the torque specifications and torque the nuts to spec. After raising the next piston to full up, repeat the process.
After ensuring the heads are polished, install the head gasket with a tiny bit of oil on each gasket side. Then install the heads and tighten the bolt using an X-pattern, tightening each bolt a bit at a time so that the head is evenly seated. Look at your reference and torque to spec. Wipe down to remove finger prints or any oil.
Remembering the configuration of push rods A-D and beginning with rod A on the far left rear cylinder, turn the engine so the tappet is completely down. Place two new o-rings on the rod tube, one on top and the other on bottom. Insert the push rod into the tube carefully and install the tube and rod into the top of the head. Be absolutely sure the o-ring is in position. Using your sense of feel, ensure the push rod is fitted into the upper rocker arm. Hold the push rod up and use a wrench to turn the adjusting screw until it touches the rod. You can use the coat hanger inserted into the previously marked spot to hold the tube up and make setting tappet clearance easier.
Tighten the adjuster screw so that a slight play up and own remains and the push rod can be finger-turned easily. You'll need to use one wrench to hold the adjuster screw and another to tighten the lock nut. Gently take the coat hanger out and lower the push rod cover bottom, making certain the bottom o-ring is in position. Next, insert the spring clip holder for the push rod.
After making certain the next tappet is fully down, repeat the process. Reinstall the oil lines using Teflon tape and a bit of Loctite on the threads. Reinstall the intake manifold with new gaskets and reinstall all the other parts in the opposite order of removal. Leave the spark plugs out until you have used the starter to turn the engine over at five second intervals four or five to ensure there is oil in the valve train. Before starting the engine, do a final cleaning to make sure everything looks nice and shows off your hard work well. Then, replace the spark plugs and start your engine.
Related Harley engine rebuild articles and products:


