Fuel Sight Tube On Custom Gas Tank!
by Mike
(Netherlands)

Custom Gas Tank
When building a custom chopper you're bound to run into some problems. For example, most custom gas tanks aren't suitable for a fuel gauge system. And you can say what you want, but it's nice to see how much fuel is left in your tank without having to shake the bike from left to right and guessing how much fuel is still in there.
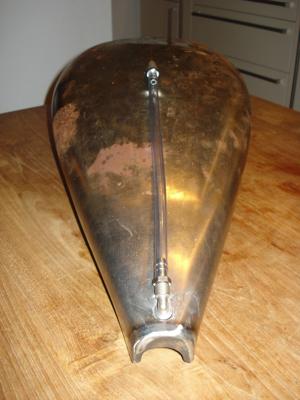
However, the lack of standard solutions can also be seen as an opportunity to come up with a really cool alternative. That's why I decided to mount a fuel sight tube on the outside of the tank.
Normally you would mount it on the side or front, in a vertical position. I did look at that option at first, but I wasn't happy with the way it looked on the side and front. So I decided to put it on top of the tank. Not an ideal position because it's not at the lowest part of the tank. Because my tank is positioned fresco style and slightly upwards, the lower part of the sight tube on the beginning of the tank is still low compared to the higher front of the tank. This way I can still get a pretty good reading on my fuel level.
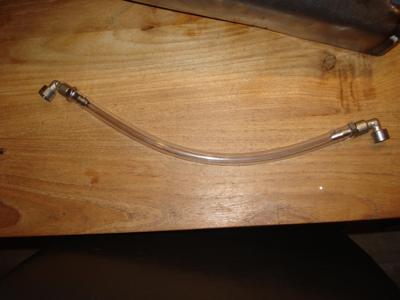
Next step was the parts and mounting it on the tank. I got a couple of bungs and fuel line fittings and a piece of tubing (fuel resistant of course). Then I had to drill two holes in the tank. First I marked the tank where the bungs should go. Then I almost made a big big mistake. I positioned the lower fitting as low as possible. But I didn't account for the tunnel being really close under the tanks top sheet metal. So I started drilling a small hole to start with, only to discover the tunnel was right underneath it. But by then, I already had this hole. Fortunately, I had just enough room to still get the bung in without hitting the tunnel. So I got the bigger drill (5/8 inch) and carefully drilled the hole. The other hole, higher up the tank, was simple.
The only thing I have to do now is weld it in place and making sure it is completely sealed. Should look awesome after the paint job.
Comments for Fuel Sight Tube On Custom Gas Tank!
|
||
|
||
|
||
|
||
|
||


